OldHunter's retro PC
| News | | | Drivers | | | Articles | | | Software | | | Hardware | | | Gaming | | | Contacts |
MS-DOS networking with mTCP
![]() Setting up a network in MS-DOS is not a trivial task. As a rule, in an era when DOS was the leader of operating systems, only a small percentage of computers were equipped with a
network card and connected to the network.
Setting up a network in MS-DOS is not a trivial task. As a rule, in an era when DOS was the leader of operating systems, only a small percentage of computers were equipped with a
network card and connected to the network.
During the reign of DOS (late 1980s to mid 1990s), the IPX/SPX protocol suite was the most popular because it was used in Novell NetWare, and also because for DOS and Windows (before Windows 95) due to the limited size of the main memory area (up to 640 kilobytes), it was very important that the IPX drivers take up a small amount of memory. Another advantage of IPX is the ease of configuration on client computers. But IPX doesn't scale well for large networks like the Internet, while TCP/IP has become a more versatile solution.
In this article, I will touch on aspects of configuring a network using the TCP protocol in classic DOS.
Microsoft MS-Net, LAN Manager & mTCP
Around a similar period, Microsoft released a product called MS-Net, to coincide with the launch of its new PC/AT. Rather than being an out-of-the-box networking solution, it was more a framework they sold to vendors who would then use it to build their own network programs. It was based on IBM's NetBIOS protocol.
In 1987 MS-Net was superceded by Microsoft LAN Manager - a program jointly developed by 3Com and Microsoft. Microsoft intended LAN Manager to be for its new OS/2 operating system it was cooperatively developing with IBM. Microsoft's version of LAN Manager continued to use the NetBIOS protocol, whereas 3Com chose to use the XNS (Xerox Network System) protocol.
The Microsoft network client was used as a local area network client under MS-DOS. Supports IPX, TCP, NETBEUI protocols. A good instruction for installing and using this software product is on the Youtube channel "Adventures in Nostalgia", this is the video "MS-DOS Networking with the Microsoft Network Client".
However, I recommend using the mTCP software product from Michael B. Brutman to solve my problems. So, as a network client from Microsoft, there are a number of drawbacks. Firstly, it eats up a very large amount of RAM, and it becomes impossible to work with a running network, and secondly, it provides only its own utilities (third-party programs like the same FTP client still require a separate packet driver). mTCP is a set of network applications such as DHCP, TELNET, NETCAT, etc. For its work, it requires only a packet driver and does not hang in memory. But it should be noted that LAN Manager has an advantage, in addition to TCP, it supports the IPX protocol, which is necessary for network gaming.
Choosing a network card
The first thing we need is a network card. It is better to opt for something mass and stable, like Realtek RTL8139 or a card from the manufacturer 3Com on the ISA bus. I will be using the D-Link DE-220PT card I have, which is a reliable Plug-and-Play ISA network card. For older computers that do not support PnP, these adapters have a very simple setup program that makes installation a matter of minutes, and the card also has auto-detection of the 8 or 16 bit ISA mode.
As a rule, network cards of that time had a PCI or ISA connector, so when choosing a network card, consider which connectors you have on the motherboard. After we have decided on the network card, we need to install it in the computer.
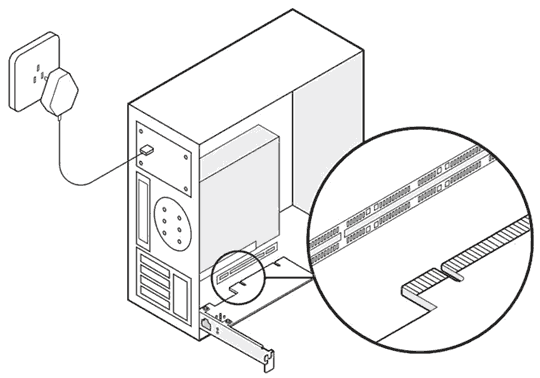
Then you need to connect the network cable and install the drivers. For some network cards common in the 90s, I posted the drivers in the appropriate section of this site.
You can also download a packet driver for your network card from the manufacturer's website. Once downloaded, unpack and copy to a folder on your hard drive (eg "C:\MTCP\PKTDRV\").
Download and install mTCP
The next step is to get the mTCP package. To get started, go to: https://www.brutman.com/mTCP/ and in the "download" section select the latest version (at the time of this writing, this is 2022-07-01). After that, I advise you to unpack the contents of the downloaded file into the "MTCP" directory on the "C:\" drive of your retro PC.
You can also download it from this site.
Setting up a network card
Now let's load up our retro car. The first thing we need to do is start the network card packet driver (with interrupt argument 0x600). It can be either a separate file or an installation kit supplied with the equipment.
Command example: DLKFET 0x600
As a result, information about the device and its MAC address should be displayed on the screen, which is evidence of a normal launch:
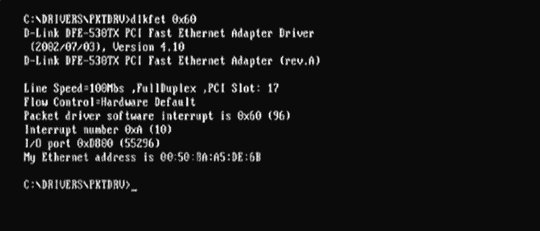
For ease of launch, you can create a ".bat" file with the following content:
@ECHO OFF
C:\MTCP\PKTDRV\DLKFET.COM 0x600
Setting up an IP address reservation on the DHCP server (router)
At this stage, we need to configure the assignment of an IP address. To do this, you must go to the settings of your router and enter the MAC address of the network card, specify the IP address for the DHCP server to explicitly assign:
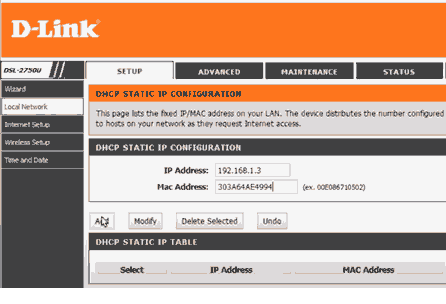
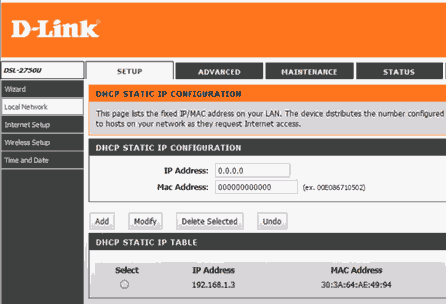
After that, your DHCP server, having seen the required network card on the network, will assign it the IP address specified by us in advance. In this example, we specified the address 192.168.1.3, but it can be any other free address of your choice. I will choose the IP address 192.168.1.108 (remember this for later)!
This setting may vary slightly depending on the interface of your device. More detailed information will be provided on the website of the manufacturer of your router.
mTCP setup
To configure mTCP, open the “sample.cfg” file from the “MTCP\samples” directory in a text editor and make the following changes, replacing the suggested options with your own, for example:
hostname RetroPC
ircjr_nick OldHunter
ircjr_user badro
ircjr_name Badro M Xurinsky
Also replace the following lines:
#ftpsrv_password_file c:\ftppass.txt
#ftpsrv_log_file c:\ftpsrv.log
on those
ftpsrv_password_file C:\MTCP\ftppass.txt
ftpsrv_log_file C:\MTCP\ftpsrv.log
At the end of the file, enter the IP settings, subnet masks and gateway:
HOSTNAME RetroPC
IPADDR 192.168.1.108
NETMASK 255.255.255.0
GATEWAY 192.168.1.1
NAMESERVER 8.8.8.8
LEASE_TIME 14400
After that, save the file under the name "tcp.cfg" to the "NET" directory of your "C:\" drive.
Now execute the command:
C:\MTCP>SET MTCPCFG=C:\MTCP\tcp.cfg
After that, run the file "DHCP.EXE":
C:\MTCP>DHCP
The result of these actions (if we did everything right) will be the following message:
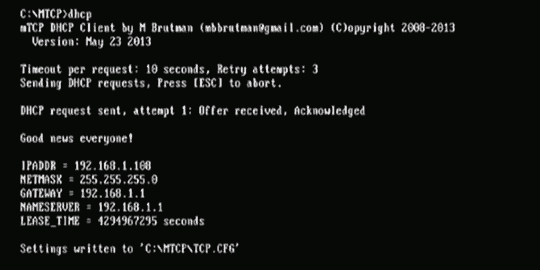
As we can see, in the end we connected to the existing network, and our computer received the IP address 192.168.1.108.
To simplify this procedure, you can create a ".bat" file, or include the following lines in your autoexec.bat:
C:\MTCP\PKTDRV\DLKFET.COM 0x600
SET MTCPCFG=C:\MTCP\tcp.cfg
C:\MTCP\DHCP.EXE
In the next article, I'll show you how to set up an FTP server on a DOS machine and run an FTP client.
List of used literature and resources
PhilsComputerLab awesome Youtube channel
DosDays - a comprehensive online resource
habr.com - article by Limows «Сеть в DOS с помощью стека mTCP»
To be continued...
Copyright 2022-2024 by OldHunter